
So, you’ve decided to join the ranks of the dwarves, but not those weird old ground dwarves.
You want to walk into battle, arm in arm with the rank and file of the dwarves who call the sky their home. Welcome to the Kharadron Overlords! For this particular list of the week we wanted to put together a quick 1K army that will be both fun and get your familiar with the various ways your army is structured.
The Battalion
Normally we’d look at building around a battalion of some sort but at 1,000 points we’d end up shoehorning ourselves. And since this is a list designed getting familiar with most of the core concepts for Kharadron Overlords, we’ll just go ahead and scratch the battalion all together. On to the next thing!
The Code
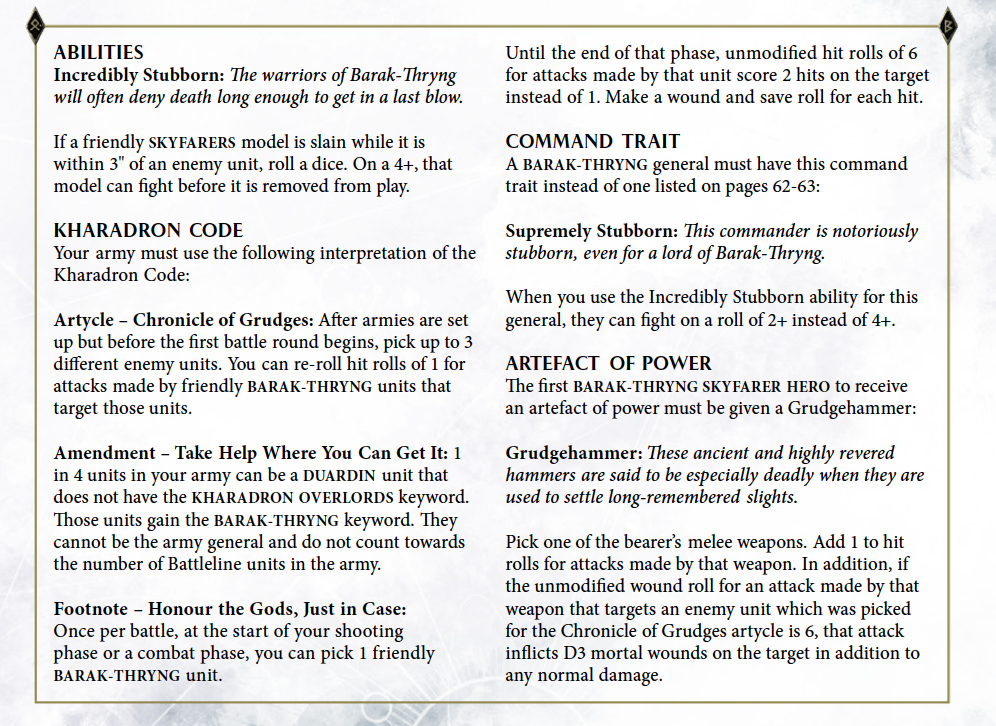
Since Kharadron Overlords always stick to a code it’s important we choose one here as well. I like Barak-Thryng because you get instant access to re-rolling hit rolls of 1 on three enemy units at the start of battle. In addition, you’ll also have the Supremely Stubborn ability so even if your units die they’ll still get an opportunity to swing in combat.
The Heroes
Endrinmaster in Dirigble Suit (General)
We’re bringing him as our general because firstly he’ll let us also bring Endrinriggers as battleline which will be helpful in keeping our Frigate on the field longer. This particular Endrinmaster also has a number of shooting attacks you’ll get to practice with and he’s certainly not a slouch in melee. Since he’s our general we’ll also get to stick him with the Grudgehammer artefact meaning we’ll add one to hit rolls for his melee weapon taking it to a 2+ to hit, plus any unmodified wound roll of 6 will do D3 mortal wounds in addition to the normal damage that gets through.
Arkanaut Admiral
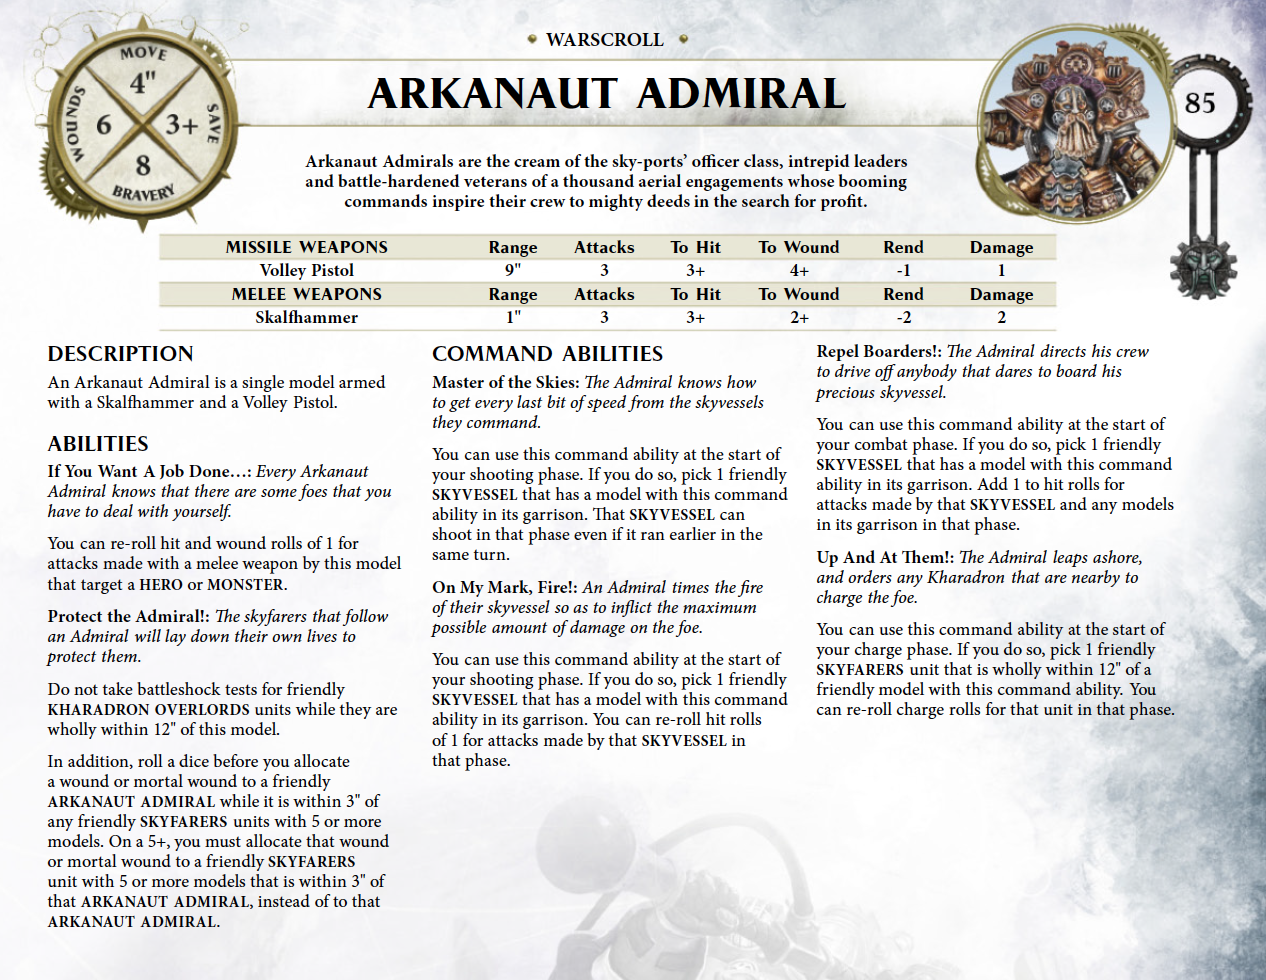
The Admiral has a lot of neat Command Abilities that we’ll want to get familiar with. Master of the Skies will be what you’ll probably use most frequently, which provides a run and shoot option where there normally wouldn’t be. And then if there’s a unit that wasn’t marked with a Grudge at the start of the game On My Mark, Fire! will be helpful in carrying the re-roll hit rolls of 1 ability over to skyvessel for other targets.
Aetheric Navigator
The Navigator has a decent shooting range and while has no casting ability of his own (because as far as the Kharadron Overlords are concerned magic isn’t real) he can attempt to unbind a spell in the enemy hero phase, or dispel and endless spell in your hero phase. The real trick is if your opponent brings anything that flies he can unleash the Aetherstorm which has the potential to either halve the unit’s move characteristic or halve the characteristic and do D3 mortal wounds … it could also do nothing which would kind of suck.
The Units:
Endrinriggers
We’re bringing a double-sized unit of Enrinriggers for double the fun of their various buildouts. I’d suggest building out with the Aethermatic Volley Gun and Drill Launcher options since we’re planning on keeping these guys close by the Frigate to keep it in tip top shape. You’ll also get to practice the Hitchers ability meaning if the Frigate does Fly High you’ll be able to keep the Enrinriggers right alongside it.
Arkanaut Company
These guys we’ll have garrisoned in the Frigate until we need to drop them off on an objective. They will get to shoot for inside the garrison as well so if you’re in range don’t forget about giving them a chance to pop off a wound or two.
The Ship:
Arkanaut Frigate
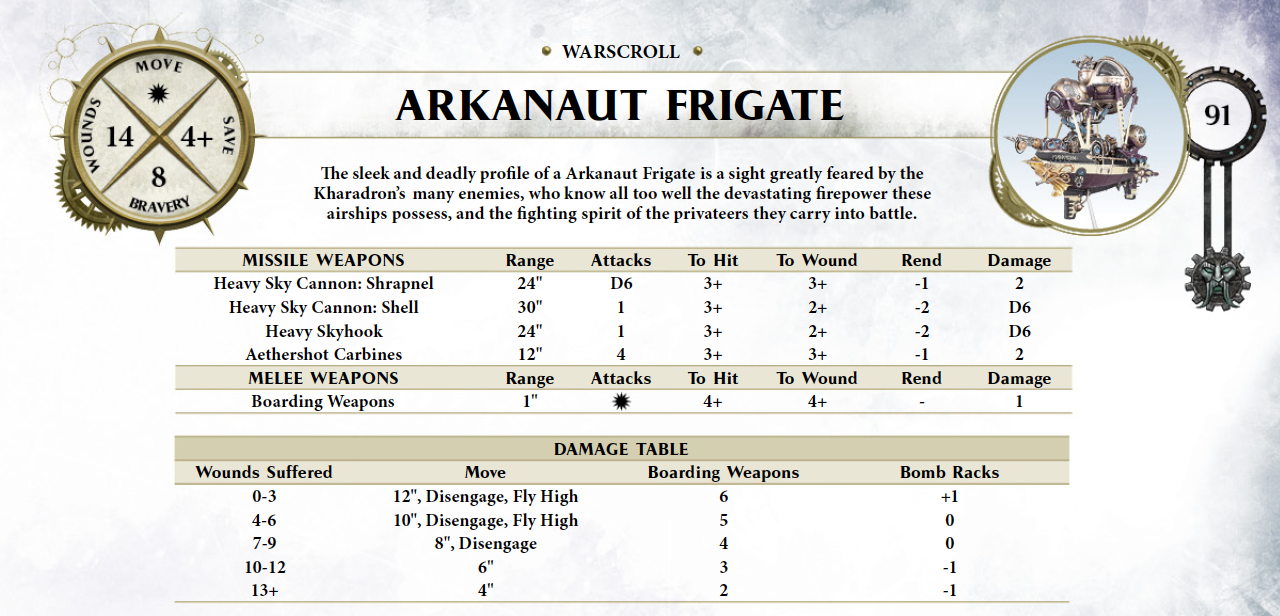
At 1,000 points the Ironclad is just a touch too expensive to be bringing and get everything else in that we want to practice with. Instead we’ll bring its little brother the Frigate so we get most of the same style of attacks if slightly less impressive. We can garrison up to 15 models in this transport without incurring penalties which is just slightly more than we need with the Arkanaut Company, Admiral and Navigator all getting nice and cozy inside. The Endrinriggers and Endrinmaster can all hang out outside and hitch a ride if necessary.
You’ll have a couple of great abilities to utilize with the Frigate including Bomb Racks – on a 4+ (plus/minus modifier for profile) one enemy unit within 1” suffers D3 mortal wounds; Disengage – this model and any models garrisoned within can retreat and shoot if there are no enemy models within 3” at the start of the retreat that can fly and the frigates profile still allows for it; and Fly High – which is a retreat and disengage while also being sort of like a teleport since you remove it from the battlefield and set it back up 1” from terrain features or objectives and 9” from enemy models.
The Game
You’ll be looking to move this 1,000-point army along as one big block. Shooting, engaging, retreating and shooting again. You’ll have a fair bit to remember but it should get easier with some practice before expanding to 2,000 points and have even more ships and dudes on the battlefield.
